Weathering for Static Model Making: Simulating Realistic Wear, Rust, and Dirt
Weathering guide: chipping, pin wash, dry brushing, filters, rust, mud, and oil spots, with AK, Ammo, Vallejo products and the correct sequence.
An impeccably painted model, with perfect colors and a glossy finish, can paradoxically seem fake. This is because real objects — tanks, airplanes, ships, vehicles — are never clean and factory-new: they are marked by use, weather, dust, rust, mud, and paint chips. This is where weathering comes in: the art of aging and dirtying a model to make it credible, telling its story through the signs of time and use.
Weathering is probably the most creative and satisfying phase of static model making, but also the one that scares people the most: you work on an already painted model (and perhaps one that took hours of work) with the risk of ruining everything. The truth is that, knowing the techniques and their sequence, weathering is more controllable and reversible than one might think. This guide covers everything: why, references, individual techniques, products from leading brands, and the correct sequence to avoid mistakes.
What is weathering and why do it
Weathering (from the English word weather) is the set of techniques that simulate the aging, wear, and dirt of a model. The purpose is not to "dirty randomly," but to plausibly reproduce the effects that real agents — rain, sun, dust, friction, fluid leaks, oxidation — produce on an object during its operational life.
There are several reasons to do weathering:
- Realism: an aged model looks real, it tells where it has been and what it has done. A tank covered in mud from the Russian steppe or an airplane with signs of operational use have an incomparable visual impact.
- Three-dimensionality: washes and dry brushing accentuate volumes, shadows, and reliefs, giving depth to surfaces that would otherwise appear flat.
- Storytelling: weathering tells a story. Chips around hatches, rust streaks, and exhaust burns speak of a well-used vehicle.
- Artistic expression: this is the phase where the modeler puts their own interpretation and sensibility.
Tip: the best weathering is plausible and contextual. A desert vehicle will be covered in light dust, an Eastern mud vehicle in dark earth, a naval aircraft in salt spray and specific wear. Study the context before dirtying.
Photographic references: the hidden secret
The single factor that most distinguishes credible weathering from artificial weathering is the use of real photographic references. Before starting, search for photographs of the real subject — the specific model of tank, airplane, or vehicle — in its operational context.
References teach you details that imagination doesn't capture: where dust actually accumulates (lower parts, recesses), how rain streaks flow (vertical, top to bottom), where paint chips (edges, tread areas, friction points), how real rust appears (rarely bright orange, more often reddish-brown and contextual). Observe photos of real vehicles and wrecks, but also industrial vehicles, rusty trains, agricultural machinery: the physics of degradation is the same.
Tip: keep reference photos next to your workbench while you work. Constantly compare your model with reality. The number one risk is overdoing it: nature is more subtle than we think.

Chipping: simulating paint chips
Chipping reproduces paint chips and flakes that reveal the underlying metal (or primer). It is one of the most effective effects, typical of military vehicles subjected to intense wear.
Sponge technique (sponge chipping)
The simplest and most controllable method. Tear a small piece of porous sponge (from blisters or open-cell synthetic sponge), lightly dip it in paint (a dark brown-metal, or a dark gray/brown for paint chipping) wiping off the excess, and gently dab it on areas subject to wear: edges, corners, passage areas. The porosity of the sponge creates irregular and realistic micro-chips. Always start with a little and gradually add more.
Hairspray technique
A more advanced and spectacular technique. The principle: paint the layers in reverse order of degradation. Apply the base color to the model (e.g., metal or base color), then spray a layer of hairspray or a specific chipping fluid, and finally the top color (the "good" paint). Once dry, wet the surface with water and gently scratch it with a stiff-bristled brush or a toothpick: the water reactivates the hairspray under the top color, which flakes off, revealing the underlying layer. This creates realistic chips, controllable in shape and size.
Dedicated products — AK Worn Effects / Heavy Chipping and Ammo Chipping fluids — are specifically formulated for this technique, more reliable than generic hairspray.
Tip: chipping should be applied judiciously. Concentrate it where wear is plausible (hatch edges, footboards, tread areas, around handles) and use realistic colors: rarely bright bare metal, more often dark tones of oxidized metal.
Pin wash and washes: adding depth to details
Wash is a fundamental technique that involves allowing a very diluted color to flow into recesses, panel lines, and around details, to accentuate them and create realistic shadows.
Pin wash
Pin wash is a targeted wash: with a thin brush, deposit the product only in panel lines, rivets, and recesses, letting capillarity draw it along the gap. Excess is removed with a clean brush or a cotton swab lightly dampened with thinner. The result is sharp shadows and highlighted details that give three-dimensionality.
Products
- AK Interactive Washes: ready-to-use washes (e.g., for aircraft and vehicle panel lines), formulated in various contextual shades.
- Lifecolor: range of popular acrylic paints and washes.
- Oil washes: many modelers prepare their own washes with oil paints diluted in odorless mineral spirits (white spirit), for maximum control and long working times.
- Enamel washes: enamel-based products are very common because they are easily removed with white spirit without affecting the underlying acrylic paint (if protected by a clear coat).
Tip: before any wash, apply a coat of gloss clear coat to the model. The glossy surface allows the wash to flow into recesses and facilitates the removal of excess; on a matte surface, the wash sticks everywhere and leaves rings.

Dry brushing: highlighting reliefs
Dry brushing is the opposite technique to washing: instead of darkening recesses, it lightens and highlights reliefs and edges.
The method: dip a stiff-bristled brush in a light color (often a lighter tone than the base color, or silver/metal for worn metallic edges), then wipe almost all the paint onto a cloth or paper until the brush is almost dry. Lightly passing the brush over the model, the small amount of remaining paint deposits only on raised parts, edges, and protruding details, highlighting them. It is perfect for bringing out textures, bolts, surface reliefs, and for simulating metallic wear on edges.
Tip: in dry brushing, the rule is "less is more." If you see paint on the brush, it's still too loaded: wipe more off. The effect is built up with light, repeated passes.
Filters: harmonizing and varying color
Filters are extremely diluted and transparent veils of color that are applied over the entire surface to slightly modify the base tone, harmonize different colors, and create chromatic variation. They don't cover, but just "tint."
A filter can warm or cool the color, unify the different shades of a camouflage, or simulate the effect of light and exposure. Dedicated products (AK Filters, Ammo Filters) are applied, or they can be prepared with very diluted oil paints, brushed over the entire surface and then blended. They are a refined technique that gives cohesion and chromatic depth to the model.
Rust: the charm of oxidation
Rust is one of the most requested effects and, if well done, one of the most striking. But it is also one of the most often done incorrectly: real rust is rarely bright and uniform orange.
Techniques and products
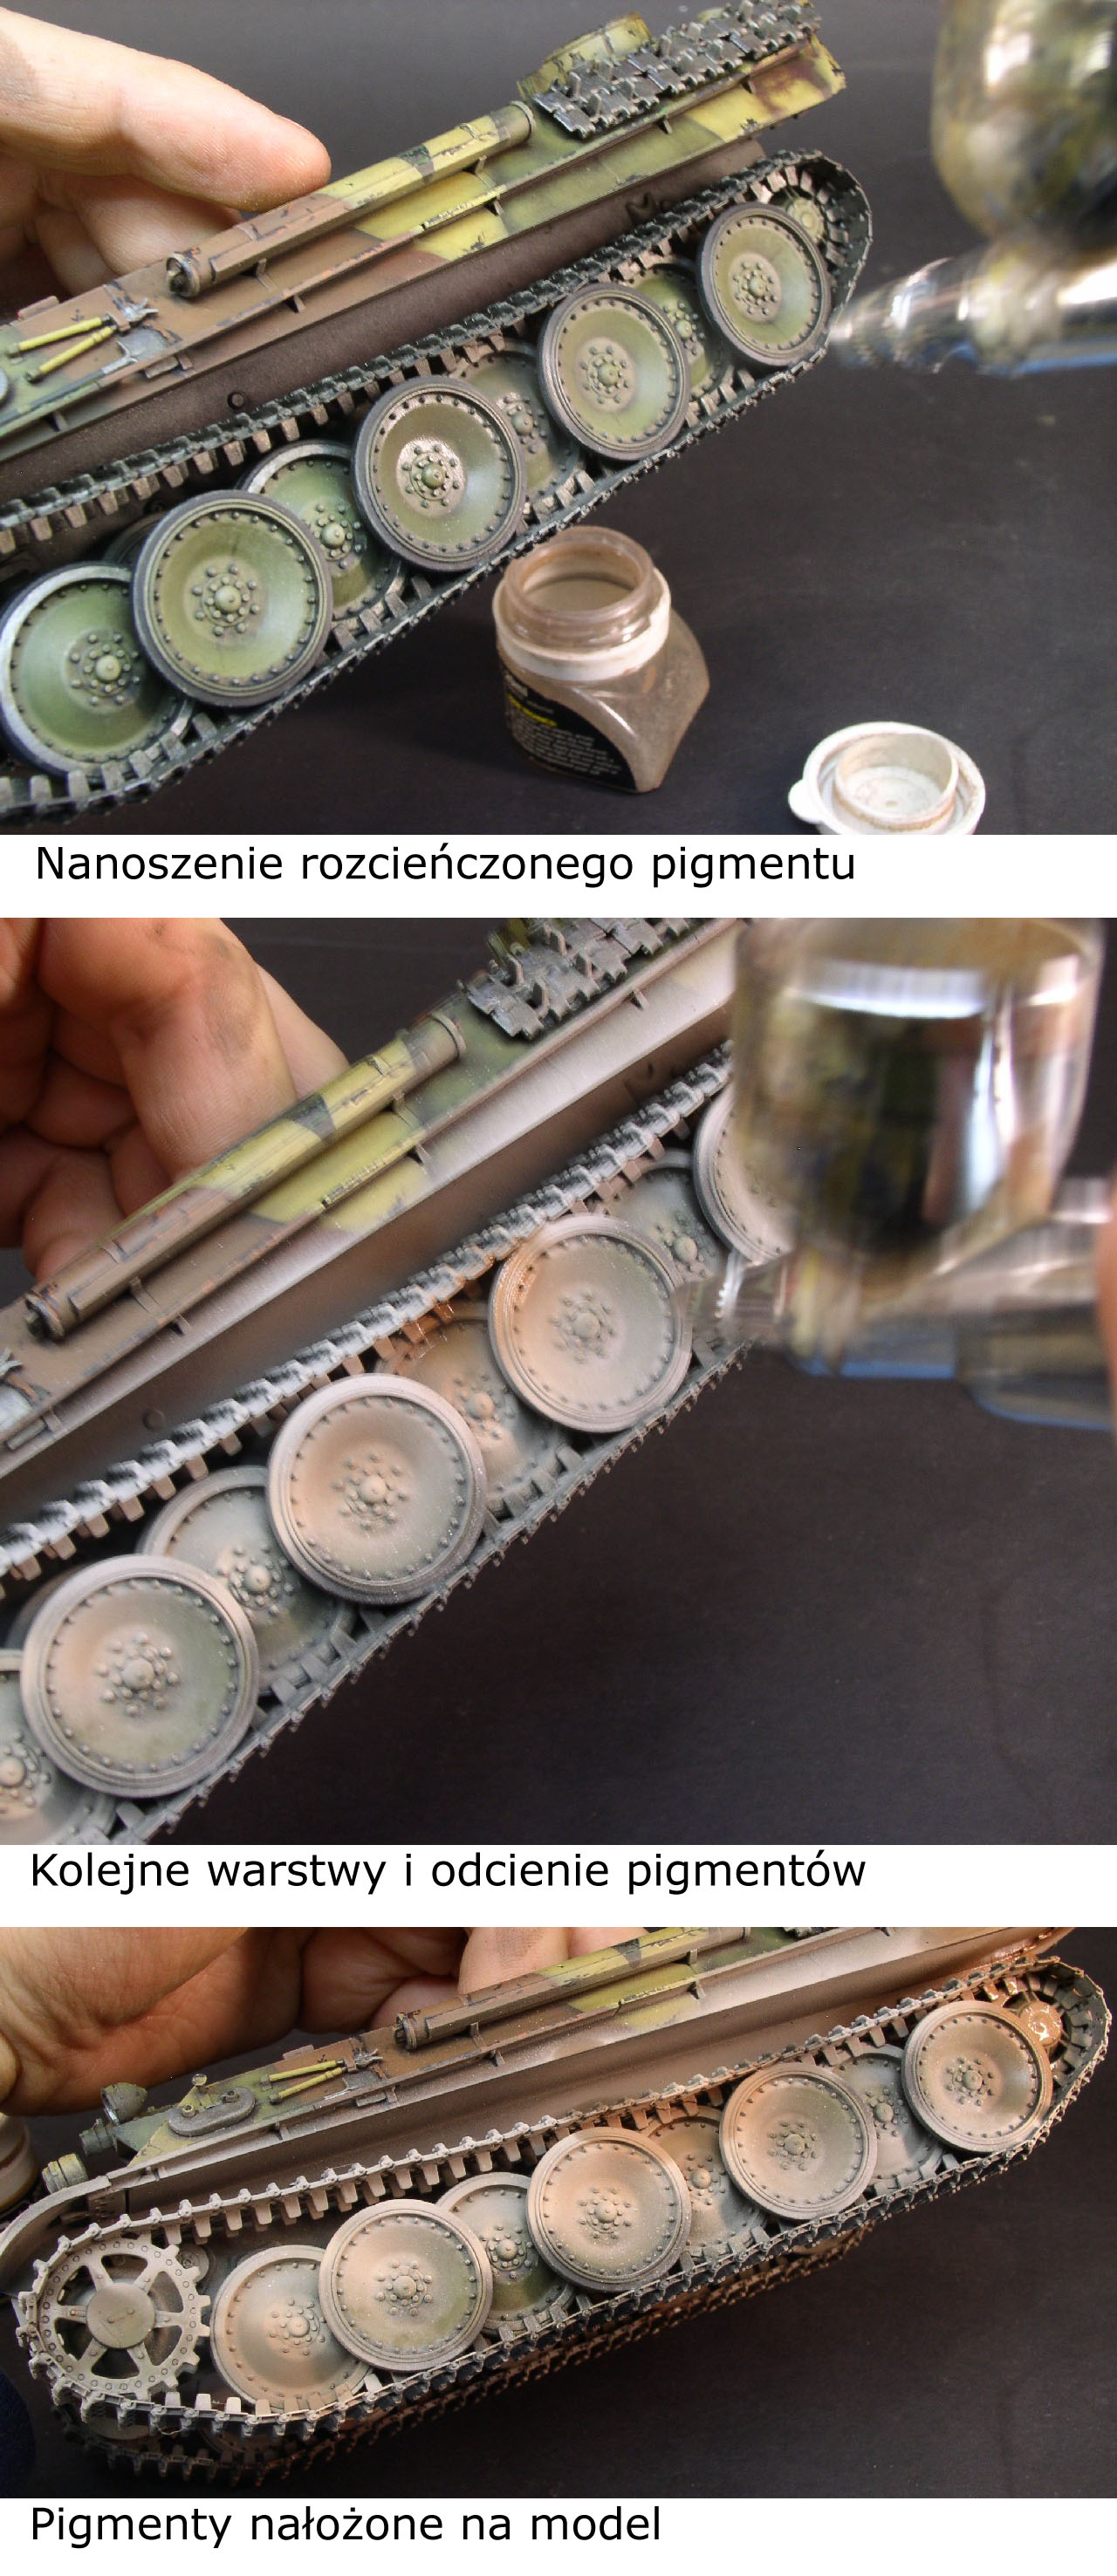
- Pigments: pigmented powders (Vallejo Pigments, AK Pigments, Mig Pigments) in shades of brown, dark orange, rust-black. They are applied dry or fixed with fixer/thinner, building realistic and three-dimensional layers of rust.
- Acrylics and specific washes: rust color sets (e.g., AK Rust set) for painting streaks, spots, and oxidized areas, blending from dark brown to orange.
- Rust streaks: with a thin brush, draw vertical streaks in accumulation points (under bolts, around rivets, along welds) and blend them downwards with a clean brush dampened with thinner, simulating rain washout.
Tip: real rust has multiple tones — from dark brown to orange, to black — and concentrates in specific points (joints, edges, exposed areas). Layer colors and use references: a monotone, orange rust betrays the model.
Mud: texture and volume
Mud adds volume and tells the story of the terrain the vehicle operated on. It is typical of military vehicles, especially on tracks, wheels, and lower parts.
For mud, texture pastes such as Ammo "Earth" texture, AK Terrains, or acrylic texture putties are used, often mixed with pigments, fine sand, and static grass to give consistency. They are applied with a spatula or old brush on the lower parts, tracks, and wheel wells, adjusting the thickness (fresh mud thicker and shinier, dry mud duller and cracked). A touch of gloss or "wet effects" products on fresh mud areas increases realism. Splatter (mud splashes) are achieved by spraying with a stiff-bristled brush loaded with diluted mud, tapping the bristles to project droplets.

Oil spots and staining: fluid stains and streaks
Real vehicles leak fluids: oil, fuel, grease. Oil spots and staining (greasy spots and streaks) tell this mechanical reality.
The classic technique is the oil dot / oil spot: tiny drops of oil paint (black, brown, raw umber) are deposited on the surface and blended with an almost dry clean brush, creating subtle variations and stains. For fluid streaks, dedicated glossy and dark products (AK Fuel Stains, Engine Oil, Ammo Fuel/Oil stains) are used, applied around fuel caps, engines, refueling points, with glossy vertical streaks that simulate fresh oil or dry residues. The glossy effect contrasts with the opacity of the surrounding weathering, attracting the eye and increasing realism.
Weathering product brands
Modern weathering revolves around a few major brands that have transformed the discipline with specific products. Knowing them helps to navigate.
Mig Jimenez
Pioneer and master of modern weathering, he first founded MIG Productions and then Ammo by Mig Jimenez. His products, books, and tutorials have defined many contemporary techniques, particularly for military vehicles.
AK Interactive
Among the most complete and widespread brands: washes, filters, pigments, chipping fluids, enamel for streaks, thematic sets. Excellent documentation and a huge range that covers every need, from aircraft to tanks to dioramas.
Ammo by Mig Jimenez
A very complete ecosystem: acrylics, enamels, oilbrushers (oil paints in tubes with integrated brush, very convenient for oil spots and filters), pigments, textures, wet effects. Designed to integrate with products from the same line.
Vallejo
In addition to paints, it offers an accessible and quality weathering range: pigments, washes, rust effects, textures for terrain and mud. A good starting point for beginners, with acrylic-based products and low toxicity.
Tip: you don't need to buy everything. Start with a dark wash, a handful of pigments (earth, dust, rust), a set of oils, and a mud texture. With this basic kit, you cover the vast majority of effects.
Historical vs. science fiction modeling
Weathering is not the same for all subjects. There is an important difference in approach between historical modeling and science fiction/fantasy modeling.
In historical modeling (military vehicles, aircraft, real ships), weathering must be faithful to documented reality: constrained by photographic references, operational context, and the materials and paints actually used. Plausibility is everything: an expert will immediately notice a rust streak where it couldn't be or dust of the wrong color for that operational theater.
In science fiction modeling (mecha, Gundam, sci-fi vehicles, Warhammer), weathering has more creative freedom: there are no "real" references, so the modeler interprets how imaginary materials would behave. However, the techniques remain the same and internal consistency is still important: even an imaginary robot must seem plausible in its world, with logical wear relative to its function. Many effects (chipping, rust, dust) are often emphasized for scenic effect.
The correct weathering sequence
Weathering follows a logical order: each technique prepares the next, and reversing the steps ruins the result. Here is a typical sequence (to be adapted to the subject):
- Painted model with decals applied. Starting point.
- Gloss clear coat. Seals color and decals and creates the smooth surface ideal for washes and to prevent decal "silvering."
- Filters. Harmonize and vary the base color before localized effects.
- Pin wash. Accentuates panel lines, recesses, and details.
- Chipping. Paint chips and wear (however, the hairspray technique should be done during painting, before the gloss).
- Dry brushing. Highlights reliefs and edges.
- Oil spots, staining, and streaks. Fluid stains and washouts.
- Rust. Built in layers in plausible spots.
- Matt clear coat. Unifies the finish and prepares for pigments.
- Pigments, dust, and mud. Final earthy effects, applied last on lower parts.
- Wet effects and final glossy effects. Fresh oil, wet mud, wet areas, applied at the end so as not to be covered by the matte coat.
Tip: the two clear coats — gloss before washes, matte before pigments — are the "checkpoints" that protect the work and make each phase reversible (a mistaken enamel wash can be removed with white spirit without affecting the sealed acrylic). Never skip them.
Conclusion
Weathering is when a model comes to life and tells its own story. From a clean assembly and careful painting, aging techniques — chipping, wash, dry brushing, filters, rust, mud, oil spots — build layer by layer the realism that makes the difference between a "plastic" model and a credible small work of art.
The secret lies in three principles: study real references so as not to overdo it, respect the sequence by protecting the work with clear coats, and always proceed from little to much, because adding is easy but removing is difficult. Start with a basic kit of products, practice on an unpretentious model, constantly compare with reality, and don't be afraid to make mistakes: weathering is the most artistic and personal phase of model making, where everyone finds their own style. Happy aging, and may your models always tell a good story!